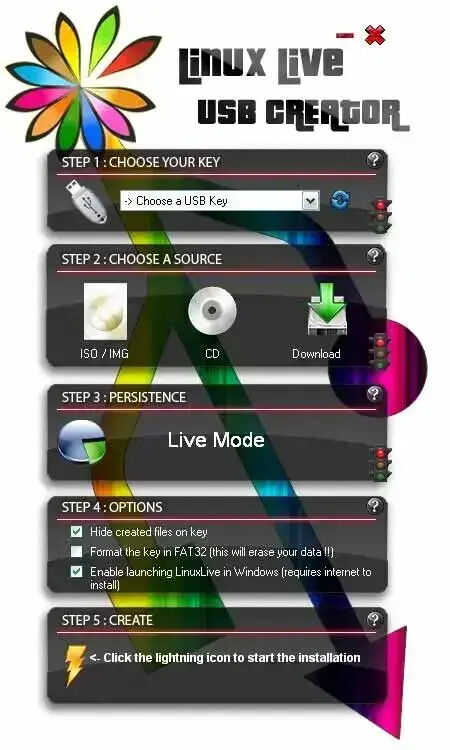
There's some software to make it like unetbootin or Linuxlive usb creator.
but I myself prefer to use Linuxlive usb creator because it more user friendly than unetbootin.
Unetbootin SS :
So, here's a way to make you USB Flashdisk become a Backtrack nest's.
First, prepare these stuff :
1. Fresh copy of Backtrack Image (you can download here)
2. Linuxlive usb creator (download here)
3. A pc or laptop to do it.. :P
Open Linuxlive usb creator
Step 1 : Choose your USB that you want to make as Backtrack USB disk
Recommended size for Live mode is 4GB.
And for Persistent Mode is >4GB.
Step 2 : Choose your ISO Image as the source. That ISO Image will be extracted to your USB Flashdisk
(Here i use Backtrack Gnome 32 bit ISO)
Step 3 : Choose your Mode.
Live Mode : Make your backtrack only runs in live mode. It means that if you boot it, make changes in it, add files in it, and do other stuff in it when rebooted, that all will disappear because your backtrack will become fresh and original again.
Persistent Mode : Make your disk persistent for Backtrack. All files and changes will be keep even when you rebooted it. This require more usb space than Live mode.
Step 4 : Choose your options
>Hide created files on key
Make the extracted ISO Files on your Flashdisk become hidden.
>Format the key in FAT32 (this will erase your data !!)
Format your USB Flashdisk into FAT32 Filesystem.
>Enable launching Linuxlive in Windows
This option will enable your Backtrack Flashdisk to be virtualized in windows. You need internet connection to do this cause this software will download virtualbox player to be integrated with your USB Flashdisk.
When everything is ready.
Hit the Lightning button
Wait for the process until completed.
After all the step performed by the software completed, your usb flashdisk is ready put on some action.


